❗❗ WARNING: NEVER PUSH TO MAIN. ❗❗
How to use GitHub
This tutorial aims to catch you up to speed on using GitHub effectively for our development. Most things you pick up through practice, but if you get stuck, you can always refer to this guide.
Terminology
- Git is a version control system (VCS) that was designed for handling non-linear workflows.
- GitHub is a hosting service that uses Git to allow users to collaborate, share, and develop software together.
- Branch is a term for a development pipeline where you branch out of the main version, and allows you to make changes without affecting the original.
- Merge is a term for when you take one branch’s code and copy it into another, along with some special Git magic.
- Pull Request (PR) is a term for a request you can make on GitHub to automatically merge a branch into another.
- Merge Conflict is a term for when the automated system cannot account for certain changes, usually when the same line of code is changed in different ways.
Workflow
You should already know how this works, but here’s what you should do, just in case.
After you are satisfied with your changes locally, here are the things you should do (in your terminal/console):
git add [FILENAME]
- If you changed multiple files, then
git add .will work to add all your files at once.
git commit -m "[YOUR MESSAGE]"
- This will commit your changes locally, with the commit message being what you choose it to be. Be descriptive.
git push
- This will push your changes to the remote repository.
Alternatively, if you have Visual Studio Code, all of this can be done in a few button clicks. Up to you to decide which one is more convenient!
Making Branches
This is the section you need to pay attention for, and will probably find yourself looking back at often.
Git allows users to create branches of their code, so that you can commit and push your changes without affecting anything else. This makes collaboration really easy and seamless, as we can all work independently without having to worry about writing conflicting code with other people.
Checking your branch
When you cd into a repository, you can use the command:
git branch
Which will show you the branch you are on, and all other branches that you have on your local machine. Before you make any changes, make sure you are on the branch you intend to change. For your reference, you may not directly make changes to the main branch. If you do, you will be struck by lightning on the spot and disappear from existence.
Switching branches
If you ever need to switch your branch, you can use the command:
git checkout [BRANCHNAME]
Where [BRANCHNAME] is the name of the branch you are switching to. For example, if I am on branch main, and I want to switch to my own development branch main-kevin, then I would simply type git checkout main-kevin and I will be on my branch. Simple!
Creating new branches
This one is a bit trickier, since where you branch from is important. Our project (for web dev) will generally be structured like this:
main
|   -> iteration-01
|   |   -> iteration-01-frontend
|   |   |   -> iteration-01-frontend-justin
|   |   |   -> iteration-01-frontend-kevin
|   |   -> iteration-01-backend
|   |   |   -> iteration-01-backend-justin
|   |   |   -> iteration-01-backend-kevin
|   -> iteration-02
|   |   -> iteration-02-frontend
|   |   |   -> iteration-02-frontend-justin
|   |   |   -> iteration-02-frontend-kevin
|   |   -> iteration-02-backend
|   |   |   -> iteration-02-backend-justin
|   |   |   -> iteration-02-backend-kevin
|    .
|    .
|    .
This structure implies that main has two branches, iteration-01 and iteration-02. Each of these branches have a frontend and backend branch, which then have each a personal branch for Justin and Kevin. As you can see, we follow a certain naming convention, where the name of the branch you branched out from is conserved, with a - delineating each branch. That is, if you are branching out from one, then you would name your branch one-two, and if you branch out from that branch, then your branch would be named one-two-three.
A really important thing to note is that what branch you branch out of matters. If you are making your branch for iteration-03-backend, then you have to first be on that branch. That is, you must first confirm your branch with git branch, and if you’re not on the branch you intend to branch out from (iteration-03-backend in this case), then you must do git checkout iteration-03-backend first. Keeping best practices will avoid countless headaches later. Trust me.
Making Pull Requests (PRs)
To make a PR, you need to be on the GitHub site. When you make a branch and commit any changes to it, you’ll see a message that pops up like this:

If you don’t see this pop-up, you can also create your branch manually by going into the Pull requests tab, clicking on New pull request, and selecting your branch as the compare branch:

Both of these options will eventually lead to this screen:
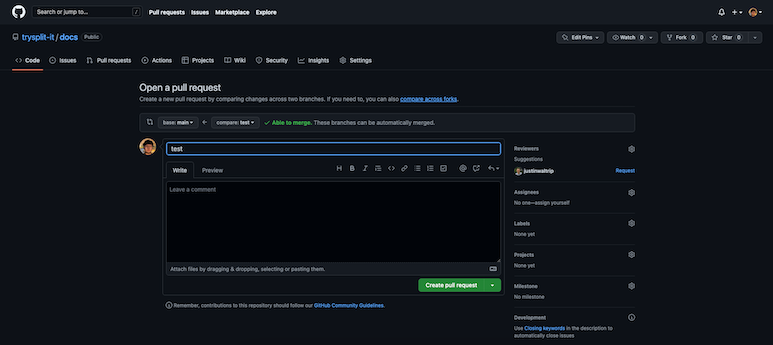
From here, make sure you are merging to the correct branch. The base branch should be the branch you are merging to, and the compare branch should be the branch you are making a request for. Once you are certain these branches are correct, add your mentor as a reviewer. Make sure you fill in the comments as according to our PR guidelines. Click Create pull request, and you are done!
Tutorial
Please follow this tutorial to cover much of the information disucssed above.